

How To Register An Email In An Active Directory
This article shows you how to set up user and grouping provisioning between Agile Directory and your Cloud Identity or Google Workspace business relationship by using Google Cloud Directory Sync (GCDS).
To follow this guide, you must have an Active Directory user that is immune to manage users and groups in Active Directory. Also, if you don't yet have a Cloud Identity or Google Workspace account, you'll need administrative access to your DNS zone in order to verify domains. If you already have a Deject Identity or Google Workspace account, brand sure that your user has super-admin privileges.
Costs
If yous're using the free edition of Cloud Identity, following this guide will non use any billable Google Cloud components.
Before you begin
- Make sure you understand how Active Directory identity management can be extended to Google Cloud.
-
Make up one's mind how you want to map identities, groups, and domains. Specifically, make sure that you lot've answered the post-obit questions:
- Which DNS domain do you plan to use as the primary domain for Deject Identity or Google Workspace? Which additional DNS domains do you plan to use equally secondary domains?
- Practice you need to apply domain substitution?
- Do you programme to use the electronic mail address (
mail service) or User Principal Proper name (userPrincipalName) as common identifiers for users? - Practise you plan to provision groups, and if and so, do y'all intend to use the common proper name (
cn) or e-mail address (post) equally common identifiers for groups?
For guidance on making these decisions, refer to the overview document on extending Active Directory identity and access direction to Google Cloud.
-
Before connecting your product Active Directory to Google Cloud, consider using an Active Directory test environment for setting up and testing user provisioning.
-
Sign upwardly for Cloud Identity if you lot don't have an account already, and add together boosted DNS domains if necessary.
-
If yous're using the complimentary edition of Deject Identity and intend to provision more 50 users, request an increase of the full number of complimentary Deject Identity users through your support contact.
-
If you suspect that any of the domains you programme to utilise for Cloud Identity could take been used by employees to register consumer accounts, consider migrating these user accounts first. For more details, meet Assessing existing user accounts.
Planning the GCDS deployment
Deciding where to deploy GCDS
GCDS tin can provision users and groups from an LDAP directory to Cloud Identity or Google Workspace. Acting equally a go-between for the LDAP server and Cloud Identity or Google Workspace, GCDS queries the LDAP directory to call back the necessary information from the directory and uses the Directory API to add, modify, or delete users in your Deject Identity or Google Workspace account.
Because Active Directory Domain Services is based on LDAP, GCDS is well suited to implement user provisioning between Agile Directory and Deject Identity or Google Workspace.
When connecting an on-premises Active Directory infrastructure to Google Deject, you can run GCDS either on-premises or on a Compute Engine virtual auto in Google Deject. In about cases, it's best to run GCDS on-premises:
- Because the data that Active Directory manages includes personally identifiable data and is usually considered sensitive, you might not want Active Directory to be accessed from outside the local network.
- Past default, Active Directory uses unencrypted LDAP. If yous access Active Directory remotely from within Google Deject, you should apply encrypted advice. Although you can encrypt the connexion by using LDAPS (LDAP+SSL) or Deject VPN.
- Communication from GCDS to Cloud Identity or Google Workspace is conducted through HTTPS and requires fiddling or no change to your firewall configuration.
You can run GCDS on either Windows or Linux. Although it's possible to deploy GCDS on the domain controller, it's best to run GCDS on a split up automobile. This machine must satisfy the organisation requirements and have LDAP access to Active Directory. Although it'south non a prerequisite for the auto to be domain joined or to run Windows, this guide assumes that Cloud Directory Sync runs on a domain-joined Windows machine.
To aid with setting up provisioning, GCDS includes a graphical user interface (GUI) called Configuration Manager. If the server on which you intend to run GCDS has a desktop feel, you can run Configuration Manager on the server itself. Otherwise, you must run Configuration Director locally and then copy the resulting configuration file to the server, where you can use information technology to run GCDS. This guide assumes that you lot run Configuration Manager on a server with a GUI.
Deciding where to retrieve data
GCDS uses LDAP to collaborate with Active Directory and to call back information about users and groups. To brand this interaction possible, GCDS requires yous to provide a hostname and port in the configuration. In a pocket-sized Active Directory environment that runs only a single global itemize server, providing a hostname and port is not a trouble considering y'all can point GCDS straight to the global catalog server.
In a more complex environment that runs redundant global catalog (GC) servers, pointing GCDS to a single server does not make use of the redundancy and is therefore not platonic. Although it'southward possible to set a load balancer that distributes LDAP queries beyond multiple global catalog servers and keeps runway of servers that might be temporarily unavailable, it's preferable to apply the DC Locator mechanism to locate servers dynamically.
By default, GCDS requires you lot to explicitly specify the endpoint of an LDAP server and does non support using the DC Locator mechanism. In this guide, you complement GCDS with a small-scale PowerShell script that engages the DC Locator machinery and so that you lot don't accept to statically configure endpoints of global catalog servers.
Preparing your Cloud Identity or Google Workspace account
Creating a user for GCDS
To enable GCDS to interact with the Directory API and Domain Shared Contacts API of Deject Identity and Google Workspace, the application needs a user account that has administrative privileges.
When signing up for Cloud Identity or Google Workspace, y'all already created one super-admin user. Although y'all could use this user for GCDS, it'southward preferable to create a split user that is exclusively used past Deject Directory Sync:
- Open up the Admin console and sign in past using the super-admin user that you created when signing upwards for Cloud Identity or Google Workspace.
- In the card, click Directory > Users, then click Add together new user to create a user.
-
Provide an appropriate name and email accost, such every bit:
- Start Name:
Google Cloud - Last Name:
Directory Sync - Primary email:
cloud-directory-sync
Retain the master domain in the email accost, fifty-fifty if the domain does not correspond to the forest that you're provisioning from.
- Start Name:
-
Ensure that Automatically generate a new password is set to Disabled, and enter a password.
-
Ensure that Enquire for a password change at the next sign-in is fix to Disabled.
-
Click Add together New User.
-
Click Done.
To enable GCDS to create, list, and delete user accounts and groups, the user needs additional privileges. Additionally, it's a adept idea to exempt the user from single sign-on—otherwise, you might not be able to re-authorize GCDS when experiencing unmarried sign-on problems. Both can be accomplished by making the user a super admin:
- Locate the newly created user in the list and open it.
- Under Admin roles and privileges, click Assign Roles.
- Enable the Super Admin role.
- Click Save.
Configuring user provisioning
Creating an Active Directory user for GCDS
To enable GCDS to retrieve information well-nigh users and groups from Active Directory, GCDS likewise requires a domain user with sufficient access. Rather than reusing an existing Windows user for this purpose, create a dedicated user for GCDS:
Graphical Interface
- Open up the Agile Directory Users and Computers MMC snap-in from the First menu.
- Navigate to the domain and organizational unit where you want to create the user. If there are multiple domains in your wood, create the user in the aforementioned domain as the GCDS machine.
- Right-click on the correct window pane and choose New > User.
- Provide an appropriate name and email address, such equally:
- First Proper name:
Google Deject - Last Name:
Directory Sync - User logon proper name:
gcds - User logon name (pre-Windows 2000):
gcds
- First Proper name:
- Click Side by side.
- Provide a countersign that satisfies your password policy.
- Clear User must change password at side by side logon.
- Select Password never expires.
- Click Next, so click Finish.
PowerShell
- Open up a PowerShell console as Ambassador.
-
Create a user by running the following command:
New-ADUser -Name "Google Cloud Directory Sync" ` -GivenName "Google Cloud" ` -Surname "Directory Sync" ` -SamAccountName "gcds" ` -UserPrincipalName (-Join("gcds@",(Get-ADDomain).DNSRoot)) ` -AccountPassword(Read-Host -AsSecureString "Blazon countersign for User") ` -Enabled $True
You now accept the prerequisites in place for installing GCDS.
Installing GCDS
On the auto on which you will run GCDS, download and run the GCDS installer. Rather than using a browser to perform the download, you can use the following PowerShell command to download the installer:
(New-Object net.webclient).DownloadFile("https://dl.google.com/dirsync/dirsync-win64.exe", "$(pwd)\dirsync-win64.exe") After the download has completed, y'all can launch the installation wizard by running the following command:
.\dirsync-win64.exe
If you accept already had GCDS installed, you lot tin can update GCDS to ensure that you are using the latest version.
Creating a folder for the GCDS configuration
GCDS stores its configuration in an XML file. Because this configuration includes an OAuth refresh token that GCDS uses to cosign with Google, make sure that you properly secure the folder used for configuration.
In addition, because GCDS does non require access to local resources other than this binder, you can configure GCDS to run as a limited user, LocalService:
- On the machine where y'all installed GCDS, sign in using either a domain or local admin user.
- Open a PowerShell panel that has administrative privileges.
-
Run the post-obit commands to create a folder that is named
$Env:ProgramData\gcdsto store the configuration, and to apply an access control list (ACL) so that just GCDS and admins have admission:$gcdsDataFolder = "$Env:ProgramData\gcds" New-Particular -ItemType directory -Path $gcdsDataFolder &icacls "$gcdsDataFolder" /inheritance:r &icacls "$gcdsDataFolder" /grant:r "CREATOR Owner:(OI)(CI)F" /T &icacls "$gcdsDataFolder" /grant "BUILTIN\Administrators:(OI)(CI)F" /T &icacls "$gcdsDataFolder" /grant "Domain Admins:(OI)(CI)F" /T &icacls "$gcdsDataFolder" /grant "LOCAL SERVICE:(OI)(CI)F" /T
-
To determine the location of the ProgramData folder, run the command
Write-Host $Env:ProgramData. On English versions of Windows, this path will usually bec:\ProgramData. You need this path afterwards.
Connecting to Google
You will now use Configuration Manager to prepare the GCDS configuration. These steps presume that you run Configuration Manager on the aforementioned server where you plan to run GCDS.
If you utilise a dissimilar machine to run Configuration Manager, brand sure to copy the configuration file to the GCDS server later on. As well, be aware that testing the configuration on a unlike automobile might not be possible.
- Launch Configuration Manager. You can find Configuration Managing director in the Windows Offset card under Google Cloud Directory Sync > Configuration Manager.
-
Click Google Domain Configuration > Connection Settings.
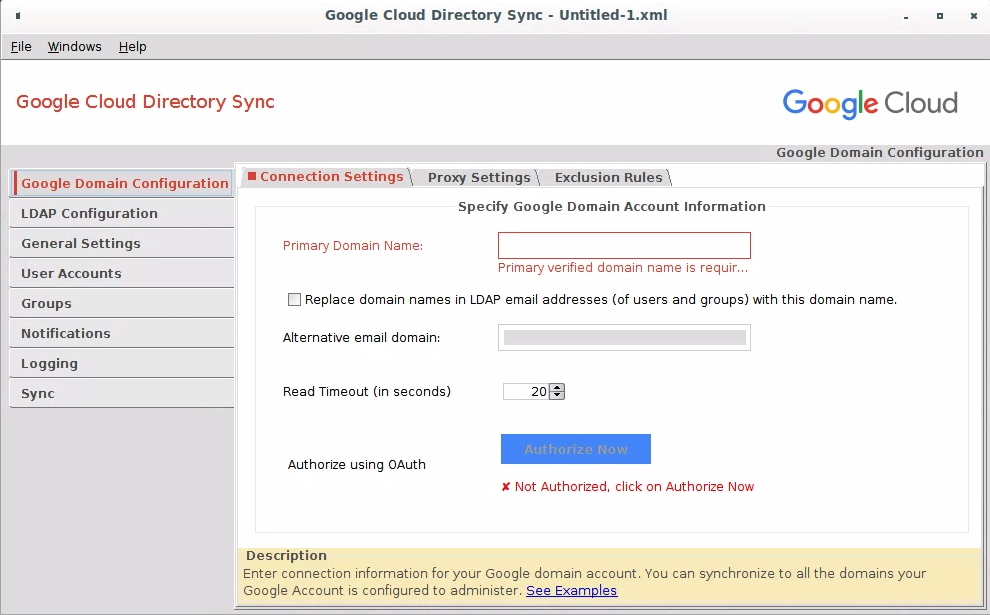
-
Authorize GCDS and configure domain settings.
-
In the menu, click File > Save as.
-
In the file dialog, enter
PROGRAM_DATA\gcds\config.xmlas the filename. ReplacePROGRAM_DATAwith the path to theProgramDatafolder that the PowerShell control returned when you lot ran it earlier. -
Click Save, and then click OK.
Connecting to Active Directory
The adjacent step is to configure GCDS to connect to Active Directory:
- In Configuration Manager, click LDAP Configuration > Connectedness Settings.
- Configure the LDAP connection settings:
- Server Type: Select MS Active Directory.
- Connection Type: Select either Standard LDAP or LDAP+SSL.
- Host Name: Enter the name of a GC server. This setting is used simply for testing. After, you will automate the discovery of the GC server.
- Port: 3268 (GC) or 3269 (GC over SSL). Using a GC server instead of a domain controller helps ensure that you can provision users from all domains of your Active Directory forest. Also, ensure authentication afterward Microsoft ADV190023 update.
- Hallmark Type: Simple.
- Authorized User: Enter the User Principal Name (UPN) of the domain user that y'all created earlier:
gcds@UPN_SUFFIX_DOMAIN. SupercedeUPN_SUFFIX_DOMAINwith the appropriate UPN suffix domain for the user. Alternatively, y'all tin too specify the user by using theNETBIOS_DOMAIN_NAME\gcdssyntax. - Base of operations DN: Exit this field empty to ensure that searches are performed across all domains in the forest.
- To verify the settings, click Examination connection. If the connection fails, double-check that y'all've specified the host name of a GC server and that the username and countersign are correct.
- Click Shut.
Deciding what to provision
Now that you've successfully connected GCDS, you can make up one's mind which items to provision:
- In Configuration Manager, click General Settings.
- Ensure that User Accounts is selected.
- If you intend to provision groups, ensure that Groups is selected; otherwise, clear the checkbox.
- Synchronizing organizational units is beyond the scope of this guide, so go out Organizational Units unselected.
- Leave User Profiles and Custom Schemas unselected.
For more than details, see Make up one's mind what to provision.
Provisioning users
Configuring user mappings
The next step is to configure how to map users betwixt Active Directory:
- In Configuration Manager, click User Accounts > Additional User Attributes.
- Click Utilise defaults to automatically populate the attributes for Given Name and Family Proper noun with
givenNameandsn, respectively.
The remaining settings depend on whether you lot intend to use the UPN or email address to map Agile Directory to users in Cloud Identity or Google Workspace, and whether you need to employ domain name substitutions. If yous're unsure which option is best for yous, come across the article on how Agile Directory identity management tin be extended to Google Deject.
UPN
- In Configuration Manager, click User Accounts > User Attributes.
- Click Use defaults.
- Modify Email Address Attribute to
userPrincipalName. - Click
proxyAddresses>Removeif yous don't want to sync allonym addresses. - Click the Search Rules tab, and so click Add Search Dominion.
-
Enter the following settings:
- Scope: Sub-tree
-
Rule:
(&(objectCategory=person)(objectClass=user)(!(userAccountControl:ane.2.840.113556.1.4.803:=2))(!(userPrincipalName=gcds@*)))
This rule matches all not-disabled users but ignores computer and managed service accounts, as well as the
gcdsuser account. -
Base DN: Leave blank to search all domains in the wood.
-
Click OK to create the dominion.
UPN: domain substitution
- In Configuration Manager, click the User Accounts > User Attributes tab.
- Click Use defaults.
- Change Email Accost Attribute to
userPrincipalName - Click
proxyAddresses>Removeif yous don't want to sync allonym addresses. - Click the Search Rules tab, and so click Add Search Rule.
-
Enter the following settings:
- Scope: Sub-tree
-
Rule:
(&(objectCategory=person)(objectClass=user)(!(userAccountControl:1.2.840.113556.1.iv.803:=2))(!(userPrincipalName=gcds@*)))
This dominion matches all non-disabled users but ignores computer and managed service accounts, equally well as the
gcdsuser account. -
Base DN: Leave blank to search all domains inside the forest.
-
Click OK to create the rule.
-
Click Google Domain Configuration > Connection Settings, and choose Supercede domain names in LDAP email addresses with this domain proper noun.
- In Configuration Director, click User Accounts > User Attributes.
- Click Use defaults.
- Click the Search Rules tab, and and then click Add Search Rule.
-
Enter the following settings:
- Scope: Sub-tree
-
Rule:
(&(objectCategory=person)(objectClass=user)(mail=*)(!(userAccountControl:ane.2.840.113556.1.iv.803:=2)))
This rule matches all non-disabled users with a non-empty email address merely ignores computer and managed service accounts.
-
Base DN: Leave blank to search all domains in the forest.
-
Click OK to create the rule.
Email: domain substitution
- In Configuration Manager, click User Accounts > User Attributes.
- Click Use defaults.
- Click
proxyAddresses>Removeif you don't desire to sync allonym addresses. - Click the Search Rules tab, and then click Employ defaults.
- Click Google Domain Configuration > Connection Settings, and choose Replace domain names in LDAP email addresses with this domain name.
For further details on mapping user attributes, see Prepare upwardly your sync with Configuration Manager.
Deletion policy
So far, the configuration has focused on calculation and updating users in Cloud Identity or Google Workspace. However, it's too important that users that are disabled or deleted in Agile Directory be suspended or deleted in Cloud Identity or Google Workspace.
As role of the provisioning process, GCDS generates a list of users in Cloud Identity or Google Workspace that don't take corresponding matches in the Active Directory LDAP query results. Because the LDAP query incorporates the clause (!(userAccountControl:i.2.840.113556.1.4.803:=two), any users that accept been disabled or deleted in Active Directory since the last provisioning was performed will be included in this list. The default behavior of GCDS is to delete these users in Cloud Identity or Google Workspace, but you tin customize this behavior:
- In Configuration Director, click User Accounts > User Attributes.
- Under Google Domain Users Deletion/Intermission Policy, ensure that Don't append or delete Google domain admins not found in LDAP is checked. This setting ensures that GCDS will non append or delete the super-admin user that you used to configure your Deject Identity or Google Workspace business relationship.
- Optionally, modify the deletion policy for non-admin users.
If you lot utilise multiple dissever instances of GCDS to provision dissimilar domains or forests to a unmarried Cloud Identity or Google Workspace business relationship, brand sure that the different GCDS instances don't interfere with one another. By default, users in Cloud Identity or Google Workspace that take been provisioned from a different source will wrongly be identified in Active Directory as having been deleted. To avert this situation, you tin can move all users that are beyond the telescopic of the domain or forest that you're provisioning from to a unmarried OU and then exclude that OU.
- In Configuration Manager, click Google Domain Configuration > Exclusion Rules.
- Click Add Exclusion Rule.
-
Configure the post-obit settings:
- Type: Organization Complete Path
- Match Type: Exact Match
-
Exclusion Rule: Enter the OU path and its name. For example:
ROOT OU/EXCLUDED OU
Replace
ROOT OU/EXCLUDED OUwith your OU path and the excluded OU'south name.
-
Click OK to create the rule.
Alternatively, if excluding a single OU doesn't fit your concern, you tin exclude domain or wood base on users' email addresses.
UPN
- In Configuration Manager, click Google Domain Configuration > Exclusion Rules.
- Click Add Exclusion Rule.
-
Configure the following settings:
- Blazon: User E-mail Address
- Match Type: Regular Expression
-
Exclusion Rule: If yous employ a single UPN suffix domain, enter the following regular expression:
.*@((?!UPN_SUFFIX_DOMAIN).*)$
ReplaceUPN_SUFFIX_DOMAINwith your UPN suffix domain, as in this example:.*@((?!corp.example.com).*)$
If yous apply more than than one UPN suffix domain, extend the expression as shown:
.*@((?!corp.case.com|co-operative.example.com).*)$
-
Click OK to create the rule.
UPN: domain substitution
- In Configuration Manager, click Google Domain Configuration > Exclusion Rules.
- Click Add Exclusion Dominion.
-
Configure the following settings:
- Blazon: User Email Address
- Match Type: Regular Expression
-
Exclusion Rule: If yous apply a single UPN suffix domain, enter the post-obit regular expression:
.*@((?!SUBSTITUTION_DOMAIN).*)$
Supercede
SUBSTITUTION_DOMAINwith the domain that y'all use to replace the UPN suffix domain, as in this instance:.*@((?!corp.example.com).*)$
-
Click OK to create the rule.
- In Configuration Manager, click Google Domain Configuration > Exclusion Rules.
- Click Add Exclusion Rule.
-
Configure the following settings:
- Blazon: User Email Address
- Friction match Type: Regular Expression
-
Exclusion Dominion: If you lot use a single UPN suffix domain, enter the following regular expression:
.*@((?!MX_DOMAIN).*)$
Supercede
MX_DOMAINwith the domain proper name that you utilise in email addresses, as in this example:.*@((?!corp.example.com).*)$
If you use more ane UPN suffix domain, extend the expression as shown:
.*@((?!corp.example.com|branch.instance.com).*)$
-
Click OK to create the dominion.
Email: domain substitution
- In Configuration Manager, click Google Domain Configuration > Exclusion Rules.
- Click Add Exclusion Rule.
-
Configure the post-obit settings:
- Blazon: User E-mail Accost
- Lucifer Blazon: Regular Expression
-
Exclusion Dominion: If you lot use a single UPN suffix domain, enter the following regular expression:
.*@((?!SUBSTITUTION_DOMAIN).*)$
Replace
SUBSTITUTION_DOMAINwith the domain that you utilise to replace the email domain, as in this case:.*@((?!corp.example.com).*)$
-
Click OK to create the rule.
For further details on deletion and intermission settings, see Acquire more virtually Configuration Manager options.
Provisioning groups
The next stride is to configure how to map groups betwixt Active Directory and Cloud Identity or Google Workspace. This procedure differs based on whether you program to map groups by common name or by electronic mail accost.
Configuring group mappings by common proper noun
First, y'all need to identify the types of security groups that yous intend to provision, and and then formulate an advisable LDAP query. The following tabular array contains common queries that you can use.
| Blazon | LDAP query |
|---|---|
| Domain local groups | (&(objectCategory=grouping)(groupType:1.2.840.113556.ane.4.803:=2147483652)) |
| Global groups | (&(objectCategory=group)(groupType:one.ii.840.113556.1.4.803:=2147483650)) |
| Universal groups | (&(objectCategory=grouping)(groupType:1.two.840.113556.one.4.803:=2147483656)) |
| Global and universal groups | (&(objectCategory=group)(|(groupType:1.2.840.113556.i.4.803:=2147483650)(groupType:one.2.840.113556.1.4.803:=2147483656))) |
| All groups | (objectCategory=group) |
The query for global groups as well covers Active Directory–defined groups such as domain controllers. Y'all can filter these groups by restricting the search by organizational unit (ou).
The remaining settings depend on whether you intend to use UPN or email address to map Active Directory to users in Cloud Identity or Google Workspace.
UPN
- In Configuration Managing director, click Groups > Search Rules.
- Click Use Defaults to add two default rules.
- Click the start dominion edit icon.
- Edit Rule to supercede the LDAP query.
- In the Groups box, enter the post-obit settings:
- Group Email Address Attribute:
cn - User Email Name Attribute:
userPrincipalName
- Group Email Address Attribute:
- Click the Prefix-Suffix tab.
-
In the Group Email Address box, enter the following settings:
-
Suffix:
@PRIMARY_DOMAIN, where you lot replace@PRIMARY_DOMAINwith the primary domain of your Cloud Identity or Google Workspace account. Although the setting seems redundant because GCDS appends the domain automatically, you must specify the setting explicitly to prevent multiple Google Cloud Directory Sync instances from erasing grouping members that they had not added.Instance:
@example.com -
Click OK.
-
-
Click the second dominion cantankerous icon to delete that rule.
- In Configuration Manager, click Groups > Search Rules.
- Click Use Defaults to add a couple of default rules.
- Click the first rule edit icon.
- Edit Dominion to replace the LDAP query.
- In the Groups box, edit Group Email Accost Attribute to enter the setting
cn. - Click OK.
The same settings as well apply if you used domain substitution when mapping users.
Configuring group mappings by e-mail accost
Kickoff, you demand to place the types of security groups that you intend to provision, and then codify an appropriate LDAP query. The following table contains common queries that you lot tin use.
| Type | LDAP query |
|---|---|
| Domain local groups with e-mail address | (&(objectCategory=group)(groupType:1.ii.840.113556.1.4.803:=2147483652)(mail=*)) |
| Global groups with email address | (&(objectCategory=group)(groupType:ane.2.840.113556.one.four.803:=2147483650)(mail=*)) |
| Universal groups with electronic mail accost | (&(objectCategory=group)(groupType:i.2.840.113556.ane.iv.803:=2147483656)(mail=*)) |
| Global and universal groups with e-mail accost | (&(objectCategory=grouping)(|(groupType:1.2.840.113556.1.4.803:=2147483650)(groupType:1.2.840.113556.1.4.803:=2147483656))(mail service=*)) |
| All groups with email address | (&(objectCategory=group)(mail=*)) |
The remaining settings depend on whether yous intend to use UPN or e-mail address to map Active Directory to users in Cloud Identity or Google Workspace.
UPN
- In Configuration Manager, click Groups > Search Rules.
- Click Use Defaults to add together two default rules.
- Click the outset rule edit icon.
- Edit Rule to replace the LDAP query.
- In the Groups box, edit User E-mail Proper noun Aspect to enter the setting
userPrincipalName. - Click OK.
- Click the second rule cross icon to delete that rule.
- In Configuration Managing director, click Groups > Search Rules.
- Click Use Defaults to add a couple of default rules.
- Click the outset rule edit icon.
- Edit Rule to supercede the LDAP query.
- Click OK.
- Click the 2d rule cross icon to remove this rule.
If you have enabled Supercede domain names in LDAP email addresses with this domain name, it likewise applies to email addresses of groups and members.
Deletion policy
GCDS handles the deletion of groups similarly to the deletion of users. If you lot use multiple separate instances of GCDS to provision dissimilar domains or forests to a single Cloud Identity or Google Workspace account, make certain that the unlike GCDS instances don't interfere with ane some other.
Past default, a group member in Cloud Identity or Google Workspace that has been provisioned from a different source will wrongly be identified in Active Directory every bit having been deleted. To avert this situation, configure GCDS to ignore all grouping members that are beyond the telescopic of the domain or wood that you're provisioning from.
UPN
- Click Google Domain Configuration > Exclusion Rules.
- Click Add Exclusion Rule.
-
Configure the following settings:
- Blazon: Group Member Email Address
- Match Type: Regular Expression
-
Exclusion Rule: If you utilize a single UPN suffix domain, enter the following regular expression:
.*@((?!UPN_SUFFIX_DOMAIN).*)$
Replace
UPN_SUFFIX_DOMAINwith your UPN suffix domain, every bit in the post-obit case:.*@((?!corp.case.com).*)$
If you lot apply more ane UPN suffix domain, extend the expression as shown:
.*@((?!corp.case.com|co-operative.example.com).*)$
-
Click OK to create the rule.
UPN: domain substitution
- Click Google Domain Configuration > Exclusion Rules.
- Click Add Exclusion Rule.
-
Configure the following settings:
- Type: Group Member Email Address
- Match Type: Regular Expression
-
Exclusion Rule: If y'all apply a single UPN suffix domain, enter the following regular expression:
.*@((?!SUBSTITUTION_DOMAIN).*)$
Supplant
SUBSTITUTION_DOMAINwith the domain that you utilize to replace the UPN suffix domain, as in this case:.*@((?!corp.instance.com).*)$
-
Click OK to create the rule.
Electronic mail
- Click Google Domain Configuration > Exclusion Rules.
- Click Add Exclusion Rule.
-
Configure the post-obit settings:
- Type: Group Member Email Address
- Match Type: Regular Expression
-
Exclusion Dominion: If you utilise a unmarried UPN suffix domain, enter the following regular expression:
.*@((?!MX_DOMAIN).*)$
Supercede
MX_DOMAINwith the domain proper noun that you employ in email addresses, as in the post-obit example:.*@((?!corp.instance.com).*)$
If you employ more than 1 UPN suffix domain, extend the expression as shown:
.*@((?!corp.example.com|co-operative.example.com).*)$
-
Click OK to create the rule.
Email: domain exchange
- Click Google Domain Configuration > Exclusion Rules.
- Click Add Exclusion Rule.
-
Configure the following settings:
- Type: Grouping Member Email Address
- Match Type: Regular Expression
-
Exclusion Dominion: If you employ a single UPN suffix domain, enter the following regular expression:
.*@((?!SUBSTITUTION_DOMAIN).*)$
Replace
SUBSTITUTION_DOMAINwith the domain that you employ to replace the email domain, as in the following example:.*@((?!corp.example.com).*)$
-
Click OK to create the rule.
For more information almost group settings, run into Larn more about Configuration Manager options.
Configure logging and notifications
Keeping users in sync requires that you run GCDS on a scheduled footing. To allow you to continue rails of GCDS activity and potential problems, you lot tin can control how and when GCDS writes its log file:
- In Configuration Director, click Logging.
- Set up File proper noun to
PROGRAM_DATA\gcds\gcds_sync.#{timestamp}.log. ReplacePROGRAM_DATAwith the path to theProgramDatafolder that the PowerShell command returned when you ran information technology earlier. -
Click File > Save to commit the configuration changes to deejay, so click OK.
In addition to logging, GCDS can transport notifications by electronic mail. To activate this service, click Notifications and provide connection information for your mail server.
Simulating user provisioning
Yous've completed the GCDS configuration. To verify that the configuration works equally intended, yous need to at kickoff save the configuration to disk and so simulate a user provisioning run. During simulation, GCDS won't perform any changes to your Cloud Identity or Google Workspace account, but volition instead report which changes it would perform during a regular provision run.
- In Configuration Manager, click Sync.
- At the lesser of the screen, select Clear enshroud, and and so click Simulate sync.
- Later the process completes, review the Proposed changes section of the log that is shown in the lower half of the dialog and verify that there are no unwanted changes such as deleting or suspending whatsoever users or groups.
Initial user provisioning
Y'all tin now trigger the initial user provisioning:
Warnings
- Triggering user provisioning will make permanent changes to users and groups in your Cloud Identity or Google Workspace business relationship.
- If you take a large number of users to provision, consider temporarily changing the LDAP query to match a subset of these users only. Using this subset of users, you tin can and so examination the procedure and adapt settings if necessary. After you've successfully validated results, change back the LDAP query and provision the remaining users.
- Avoid repeatedly modifying or deleting a large number of users when testing because such deportment might exist flagged every bit abusive behavior.
Trigger a provision run as follows:
- In Configuration Manager, click Sync.
-
At the bottom of the screen, select Clear cache, and and then click Sync & utilise changes.
A dialog appears showing the status.
-
Subsequently the procedure completes, check the log that is shown in the lower half of the dialog:
- Under Successful user changes, verify that at least one user has been created.
- Under Failures, verify that no failures occurred.
Scheduling
To ensure that changes performed in Active Directory are propagated to your Cloud Identity or Google Workspace account, set up a scheduled task that triggers a provisioning run every hour:
- Open a PowerShell console as Ambassador.
-
Bank check if the Active Directory PowerShell module is bachelor on the system:
import-module ActiveDirectory
If the command fails, download and install the Remote Server Administration Tools and endeavor once more.
-
In Notepad, create a file, copy the following content into information technology, and save the file to
%ProgramData%\gcds\sync.ps1. When you're done, close the file.[CmdletBinding()] Param( [Parameter(Mandatory=$True, Position=i)] [cord]$config, [Parameter(Mandatory=$True, Position=1)] [cord]$gcdsInstallationDir ) import-module ActiveDirectory # Finish on error. $ErrorActionPreference ="stop" # Ensure it's an accented path. $rawConfigPath = [Organisation.IO.Path]::Combine((pwd).Path, $config) # Find closest GC in current domain. $dc = Go-ADDomainController -discover -Service "GlobalCatalog" -NextClosestSite Write-Host ("Using GC server {0} of domain {i} every bit LDAP source" -f [string]$dc.HostName, $dc.Domain) # Load XML and replace the endpoint. $dom = [xml](Get-Content $rawConfigPath) $ldapConfigNode = $dom.SelectSingleNode("//plugin[@class='com.google.usersyncapp.plugin.ldap.LDAPPlugin']/config") # Tweak the endpoint. $ldapConfigNode.hostname = [string]$dc.HostName $ldapConfigNode.ldapCredMachineName = [cord]$dc.HostName $ldapConfigNode.port = "3268" # E'er use GC port # Tweak the tsv files location $googleConfigNode = $dom.SelectSingleNode("//plugin[@class='com.google.usersyncapp.plugin.google.GooglePlugin']/config") $googleConfigNode.nonAddressPrimaryKeyMapFile = [System.IO.Path]::Combine((pwd).Path, "nonAddressPrimaryKeyFile.tsv") $googleConfigNode.passwordTimestampFile = [System.IO.Path]::Combine((pwd).Path, "passwordTimestampCache.tsv") # Salvage resulting config. $targetConfigPath = $rawConfigPath + ".autodiscover" $writer = New-Object Organization.IO.StreamWriter($targetConfigPath, $False, (New-Object Organization.Text.UTF8Encoding($Simulated))) $dom.Save($writer) $writer.Close() # Starting time provisioning. Start-Process -FilePath "$gcdsInstallationDir\sync-cmd" ` -Wait -ArgumentList "--apply --config ""$targetConfigPath""" -
Configuration Manager created a secret key to encrypt the credentials in the config file. To ensure that GCDS can withal read the configuration when it'due south run equally a scheduled job, run the following commands to copy that hole-and-corner key from your own profile to the contour of
NT Authorisation\LOCAL SERVICE:New-Item -Path Registry::HKEY_USERS\S-one-5-19\SOFTWARE\JavaSoft\Prefs\com\google\usersyncapp -Force; Re-create-Item -Path Microsoft.PowerShell.Core\Registry::HKEY_CURRENT_USER\SOFTWARE\JavaSoft\Prefs\com\google\usersyncapp\util ` -Destination Microsoft.PowerShell.Core\Registry::HKEY_USERS\Due south-1-5-19\SOFTWARE\JavaSoft\Prefs\com\google\usersyncapp\util
If the commands fail, ensure that you started the PowerShell console as Ambassador.
-
Create a scheduled task past running the following commands. The scheduled task will be triggered every 60 minutes and invokes the
sync.ps1script asNT AUTHORITY\LOCAL SERVICE.$taskName = "Synchronize to Deject Identity" $gcdsDir = "$Env:ProgramData\gcds" $action = New-ScheduledTaskAction -Execute 'PowerShell.exe' ` -Argument "-ExecutionPolicy Bypass -NoProfile $gcdsDir\sync.ps1 -config $gcdsDir\config.xml -gcdsInstallationDir '$Env:Programfiles\Google Cloud Directory Sync'" ` -WorkingDirectory $gcdsDir $trigger = New-ScheduledTaskTrigger ` -Once ` -At (Get-Engagement) ` -RepetitionInterval (New-TimeSpan -Minutes 60) ` -RepetitionDuration (New-TimeSpan -Days (365 * 20)) $primary = New-ScheduledTaskPrincipal -UserID "NT AUTHORITY\LOCAL SERVICE" -LogonType ServiceAccount Register-ScheduledTask -Action $action -Trigger $trigger -Principal $master -TaskName $taskName $task = Go-ScheduledTask -TaskName "$taskName" $task.Settings.ExecutionTimeLimit = "PT12H" Set-ScheduledTask $task
For more than information, see Schedule automated synchronzations.
Testing user provisioning
You lot've completed the installation and configuration of GCDS, and the scheduled task will trigger a provision run every hour.
To trigger a provisioning run manually, switch to the PowerShell console and run the post-obit control:
Get-go-ScheduledTask "Synchronize to Cloud Identity"
Clean up
To remove GCDS, perform the following steps:
- Open up Windows Control Panel and click Programs > Uninstall a program.
- Select Google Cloud Directory Sync, and click Uninstall/Modify to launch the uninstall wizard. Then follow the instructions in the wizard.
-
Open a PowerShell console and run the post-obit control to remove the scheduled task:
$taskName = "Synchronize to Cloud Identity" Unregister-ScheduledTask -TaskName $taskName -Ostend:$False
-
Run the following command to delete the configuration and log files:
Remove-Item -Recurse -Force "$Env:ProgramData\gcds" Remove-Detail -Recurse -Path Registry::HKEY_USERS\S-1-5-xix\SOFTWARE\JavaSoft\Prefs\com\google\usersyncapp

How To Register An Email In An Active Directory,
Source: https://cloud.google.com/architecture/identity/federating-gcp-with-active-directory-synchronizing-user-accounts
Posted by: preeceanstating.blogspot.com
0 Response to "How To Register An Email In An Active Directory"
Post a Comment